PProf
Golang 提供了程序性能分析工具 pprof。性能分析(profiling)可以收集运行期间的程序性能情况,弥补了其他静态测试方法的不足。pprof 支持三种方式采样和生成性能报告(profile):
- 通过 runtime/pprof 包将采集结果保存到文件;
- 通过 net/http/pprof 打开 /debug/pprof HTTP 接口暴露数据;
go test -cpuprofile=cpu.profile 命令采集测试用例运行的性能数据。
 1
 2
 3
 4
 5
 6
 7
 8
 9
10
11
12
| // 分析报告导出为文件
func main() {
f, _ := os.Create("cpu.profile")
defer f.Close()
pprof.StartCPUProfile(f)
defer pprof.StopCPUProfile()
for i := 0; i < 3; i++ {
go sum()
}
}
|
 1
 2
 3
 4
 5
 6
 7
 8
 9
10
11
12
13
14
15
16
| func sum() {
d := 0
for i := 0; i < 10_000_000_000; i++ {
d += i
}
}
func main() {
for i := 0; i < 3; i++ {
go sum()
}
// 使用 go tool pprof -web 127.0.0.1:8080 http://127.0.0.1:9090/debug/pprof/profile\?seconds\=2
// 可查看 2 秒内,CPU 性能分析报告
http.ListenAndServe(":9090", nil)
}
|
Profile 类型
Profile 分析统计记录的是一组调用栈以及相关的事件,比如 CPU 使用时间、内存分配、阻塞时间等。Profile 除了 CPU 比较特殊以为,还有以下几种:
- goroutine:当前所有 goroutine 以及调用栈;
- heap:堆内存以及存活对象内存分配统计
- block:记录阻塞事件
- mutex:记录锁竞争
CPU
CPU 是最基础的性能分析,开启采样需要在代码中调用 pprof.StartCPUProfile 和 pprof.StopCPUProfile,或调用 /debug/pprof?seconds=<duration> HTTP 接口。pprof 默认采样间隔是 100ms。另外,仅 CPU profile 支持 label 给不同 goroutine 打标签帮助细分采样来源。
Heap
pprof 主要关注堆内存的情况。pprof 采样会记录上一次 GC 到采样的堆内存分配状况。pprof 默认每分配 512kb 的内存触发一次采样。heap profile 又分为四种:inuse_space(默认,当前用量 bytes),inuse_objects(当前存活对象数),alloc_space 和 alloc_objects,记录当前内存分配以及过去所有内存分配汇总情况,这样我们不仅可以知道一个程序运行时当前分配的内存情况,以及哪段代码过往内存分配很大。如果要保存 alloc_* 信息,则将代码中的 pprof.WriteHeapProfile 替换为 pprof.Lookup(“allocs”).WriteTo(file, 0)。
 1
 2
 3
 4
 5
 6
 7
 8
 9
10
11
12
13
14
15
16
| func main() {
f, _ := os.Create("mem.profile")
defer f.Close()
runtime.GC()
defer pprof.WriteHeapProfile(f)
s := make([]byte, 0)
for i:= 0; i < 1024 * 1024 * 10; i++{
s = append(s, 1)
}
// s = nil
// runtime.GC()
// 如果再调用一次 GC,则采样结果会为空
}
|
以下是内存分配采样底层实现简化代码,可以看到 go 是如何采样埋点的:
 1
 2
 3
 4
 5
 6
 7
 8
 9
10
| func malloc(size):
object = ... // allocation magic
if poisson_sample(size):
s = stacktrace()
mem_profile[s].allocs++
mem_profile[s].alloc_bytes += size
track_profiled(object, s)
return object
|
Block
Block profile 记录阻塞事件持续时间以及源头(stack trace 信息)。pprof 记录的阻塞事件包括:select 语句、chan 接收/发送、获取锁,但不包括 time.Sleep、GC 停顿、syscall(网络、文件 I/O)。采用频率可以通过 runtime.SetBlockProfileRate 设置,设置为 1 上是开启 block 采样。BlockProfileRate 的值(单位 ns)影响采样概率,比如设置 rate 纳秒,而实际阻塞 duration 纳秒,那么这次阻塞有 duration/rate 的概率被选中记录下来,否则丢弃。
 1
 2
 3
 4
 5
 6
 7
 8
 9
10
11
12
13
14
| func main() {
// 设置 rate = 2s,一半的概率记录阻塞持续 1s 的事件,
// 一半概率丢弃
runtime.SetBlockProfileRate(1000 * 1000 * 1000 * 2)
// 阻塞 goroutine,阻塞 1s
go func() {
select {
case <-time.After(1 * time.Second):
}
}()
http.ListenAndServe(":9090", nil)
}
|
以下是阻塞事件采样底层实现简化代码,有助于我们理解 BlockProfileRate 的含义:
 1
 2
 3
 4
 5
 6
 7
 8
 9
10
11
12
13
14
15
16
17
| func chansend(channel, msg):
if ready(channel):
send(channel, msg)
return
start = now()
wait_until_ready(channel) // Off-CPU Wait
duration = now() - start
// 埋点采样
if random_sample(duration, rate):
s = stacktrace()
// note: actual implementation is a bit trickier to correct for bias
block_profile[s].contentions += 1
block_profile[s].delay += duration
send(channel, msg)
|
1
2
3
4
| func random_sample(duration, rate):
if rate <= 0 || (duration < rate && duration/rate > rand(0, 1)):
return false
return true
|
Mutex
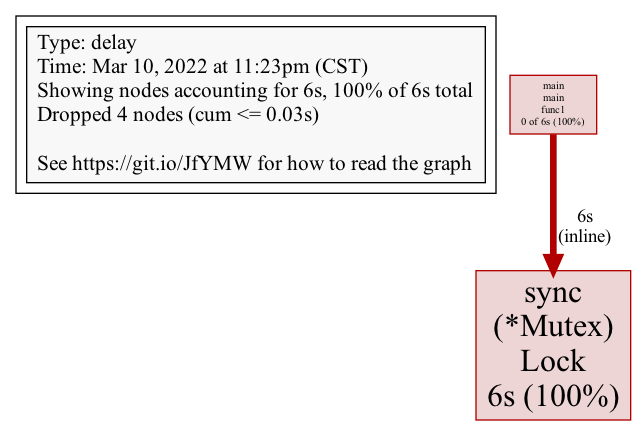
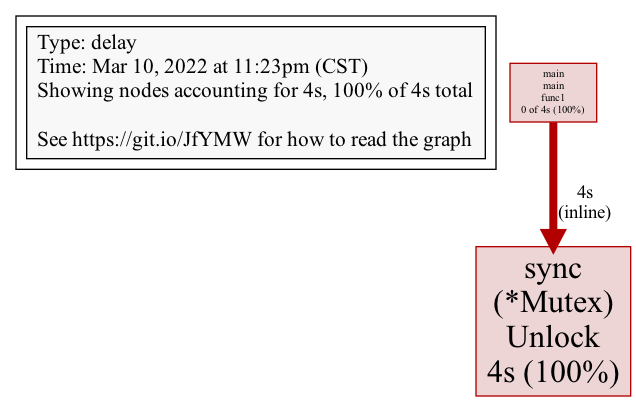
Mutex profile 记录锁竞争的情况,和 Block profile 还不一样。运行下面代码,会发现 Block 记录的是 6 秒,Mutex 记录的是 4 秒。这是因为,Block 记录的是 Lock 锁等待阻塞的时间,第一个 goroutine 无须等待,第二个 goroutine 等待前一个 goroutine 释放,耗时 2 秒,第三个 goroutine 等待前两个锁占用释放,耗时 4 秒,因此 0+2+4=6;而 Mutex 记录的是每个锁请求者,从 Lock 到 Unlock 的时间,而最后一个 goroutine 因为不存在锁竞争,无须纳入统计,因此 2+2=4。
 1
 2
 3
 4
 5
 6
 7
 8
 9
10
11
12
13
14
15
16
17
18
| // 分别查看 blcok 和 mutex profile
// go tool pprof -http 127.0.0.1:8080 http://127.0.0.1:9090/debug/pprof/block
// go tool pprof -http 127.0.0.1:8081 http://127.0.0.1:9090/debug/pprof/mutex
func main() {
runtime.SetBlockProfileRate(1)
runtime.SetMutexProfileFraction(1)
m := &sync.Mutex{}
for i := 0; i < 3; i++ {
go func() {
m.Lock()
time.Sleep(2 * time.Second)
m.Unlock()
}()
}
http.ListenAndServe(":9090", nil)
}
|
Block 结果:
Mutex 结果:
以下是锁竞争采样底层实现简化代码,有助于我们理解 Block 与 Mutex 的区别:
1
2
3
4
5
6
7
| func semacquire(lock):
if lock.take():
return
start = now()
waiters[lock].add(this_goroutine(), start)
wait_for_wake_up()
|
 1
 2
 3
 4
 5
 6
 7
 8
 9
10
11
12
13
| func semrelease(lock):
next_goroutine, start = waiters[lock].get()
if !next_goroutine:
// If there weren't any waiting goroutines, there is no contention to record
return
duration = now() - start
if rand(0,1) < 1 / rate:
s = stacktrace()
mutex_profile[s].contentions += 1
mutex_profile[s].delay += duration
wake_up(next_goroutine)
|
Goroutine
统计当前 goroutine 情况。
可视化
Profile 可视化有两种:调用图和火焰图。
调用图
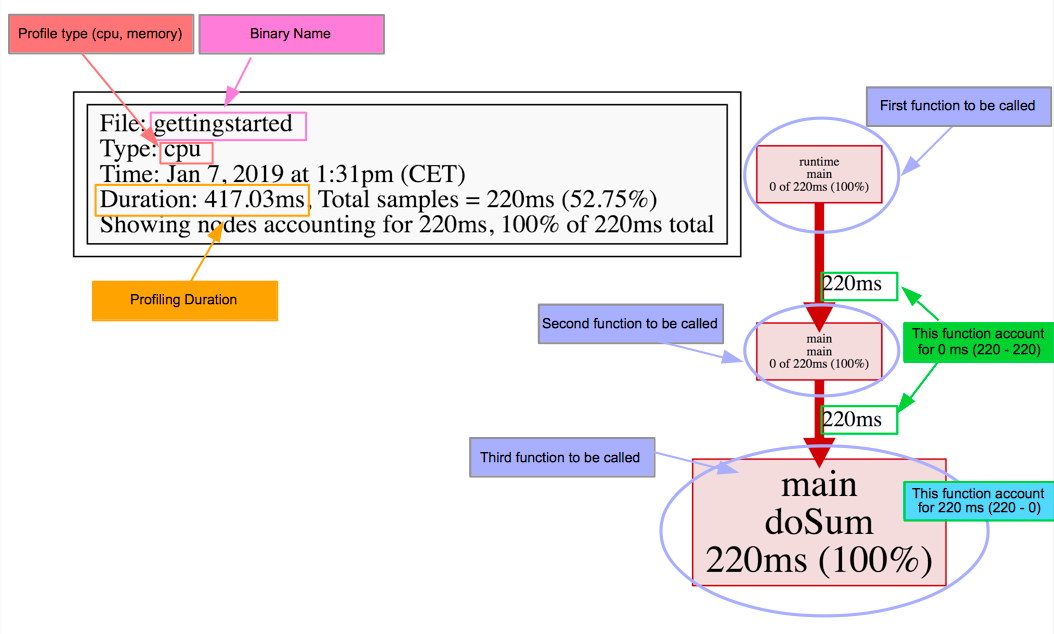
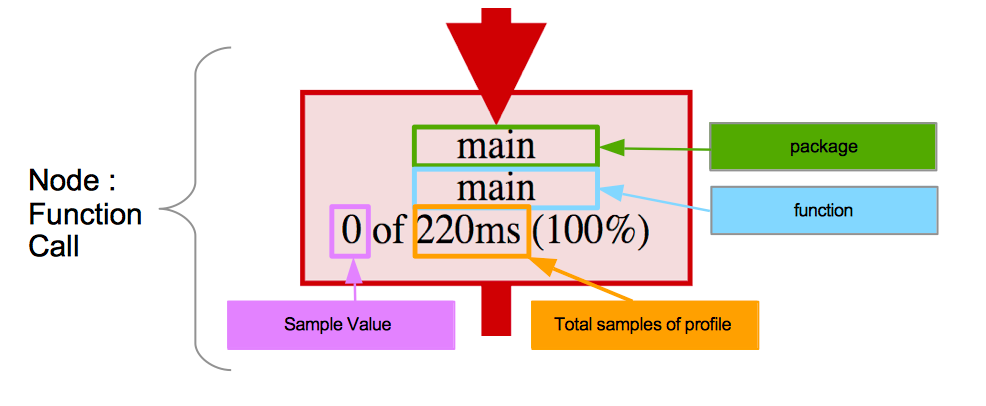
调用图(callgraph)展示栈内的函数调用关系。一个调用图中包含若干节点(node)和边(edge):
- 红灰颜色区分采样值为正值或近乎零值;
- 节点字体大小采样值的大小;
- 边的宽度代表调用过程资源的消耗情况。
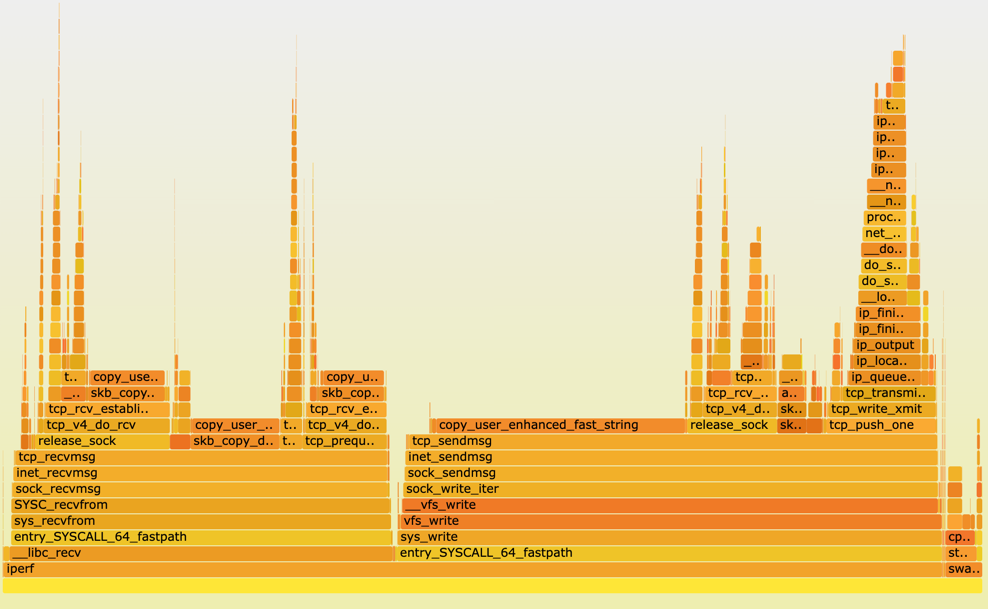
火焰图
火焰图(flame graph)展示 CPU 正在执行的函数名以及调用栈:
- 上边缘(top edge)表示在 CPU 上运行的函数以及相应调用栈;
- 关注顶层的哪个函数占据的宽度最大。出现"平顶"(plateaus)表示该函数可能存在性能问题;
- y 轴表示调用栈,每一层都是一个函数。调用栈越深,火焰就越高;
- x 轴表示不同抽样,不代表时间,而是所有的调用栈合并后,按字母顺序排列的。
文本
/debug/pprof/profile?debug= HTTP 接口,当 debug 为 0,导出 protobuf 文件格式的 profile 数据;当 debug 为 1,输出具有可读性的文本结果。
Profile 格式
Profile 使用 protobuf 编码。protobuf 文件格式的 profile 可以通过 protoc 命令行解析:
  1
  2
  3
  4
  5
  6
  7
  8
  9
 10
 11
 12
 13
 14
 15
 16
 17
 18
 19
 20
 21
 22
 23
 24
 25
 26
 27
 28
 29
 30
 31
 32
 33
 34
 35
 36
 37
 38
 39
 40
 41
 42
 43
 44
 45
 46
 47
 48
 49
 50
 51
 52
 53
 54
 55
 56
 57
 58
 59
 60
 61
 62
 63
 64
 65
 66
 67
 68
 69
 70
 71
 72
 73
 74
 75
 76
 77
 78
 79
 80
 81
 82
 83
 84
 85
 86
 87
 88
 89
 90
 91
 92
 93
 94
 95
 96
 97
 98
 99
100
101
102
103
104
105
106
107
108
109
110
111
112
113
114
| $ protoc --decode perftools.profiles.Profile --proto_path /go/pkg/mod/github.com/google/pprof/proto /go/pkg/mod/github.com/google/pprof/proto/profile.proto < cpu.pb
sample_type {
type: 1
unit: 2
}
sample_type {
type: 3
unit: 4
}
sample {
location_id: 1
location_id: 2
value: 27
value: 270000000
}
sample {
location_id: 3
location_id: 4
location_id: 2
value: 1
value: 10000000
}
sample {
location_id: 5
location_id: 2
value: 1
value: 10000000
}
mapping {
id: 1
has_functions: true
}
location {
id: 1
mapping_id: 1
address: 18351209
line {
function_id: 1
line: 24
}
}
location {
id: 2
mapping_id: 1
address: 17006246
line {
function_id: 2
line: 255
}
}
location {
id: 3
mapping_id: 1
address: 17205824
line {
function_id: 3
line: 8
}
}
location {
id: 4
mapping_id: 1
address: 18351208
line {
function_id: 1
line: 24
}
}
location {
id: 5
mapping_id: 1
address: 18351212
line {
function_id: 1
line: 24
}
}
function {
id: 1
name: 5
system_name: 5
filename: 6
}
function {
id: 2
name: 7
system_name: 7
filename: 8
}
function {
id: 3
name: 9
system_name: 9
filename: 10
}
string_table: ""
string_table: "samples"
string_table: "count"
string_table: "cpu"
string_table: "nanoseconds"
string_table: "main.main"
string_table: "/Users/huanggze/go/src/awesomeProject/main.go"
string_table: "runtime.main"
string_table: "/usr/local/go/src/runtime/proc.go"
string_table: "runtime.asyncPreempt"
string_table: "/usr/local/go/src/runtime/preempt_amd64.s"
time_nanos: 1647258507517428000
duration_nanos: 500869588
period_type {
type: 3
unit: 4
}
period: 10000000
|
注意,不可以省略 –proto_path,否则会报错:
/go/pkg/mod/github.com/google/pprof/proto/profile.proto: File does not reside within any path specified using –proto_path (or -I). You must specify a –proto_path which encompasses this file. Note that the proto_path must be an exact prefix of the .proto file names – protoc is too dumb to figure out when two paths (e.g. absolute and relative) are equivalent (it’s harder than you think).
每一个 sample 代表一次采样(记录一个完整调用栈),location 描述的是采样在内存中的地址,mapping 关联内存地址和代码文件信息。你甚至可以用 Go 代码实现 DIY 出一个 profile。
Profile 分析工具
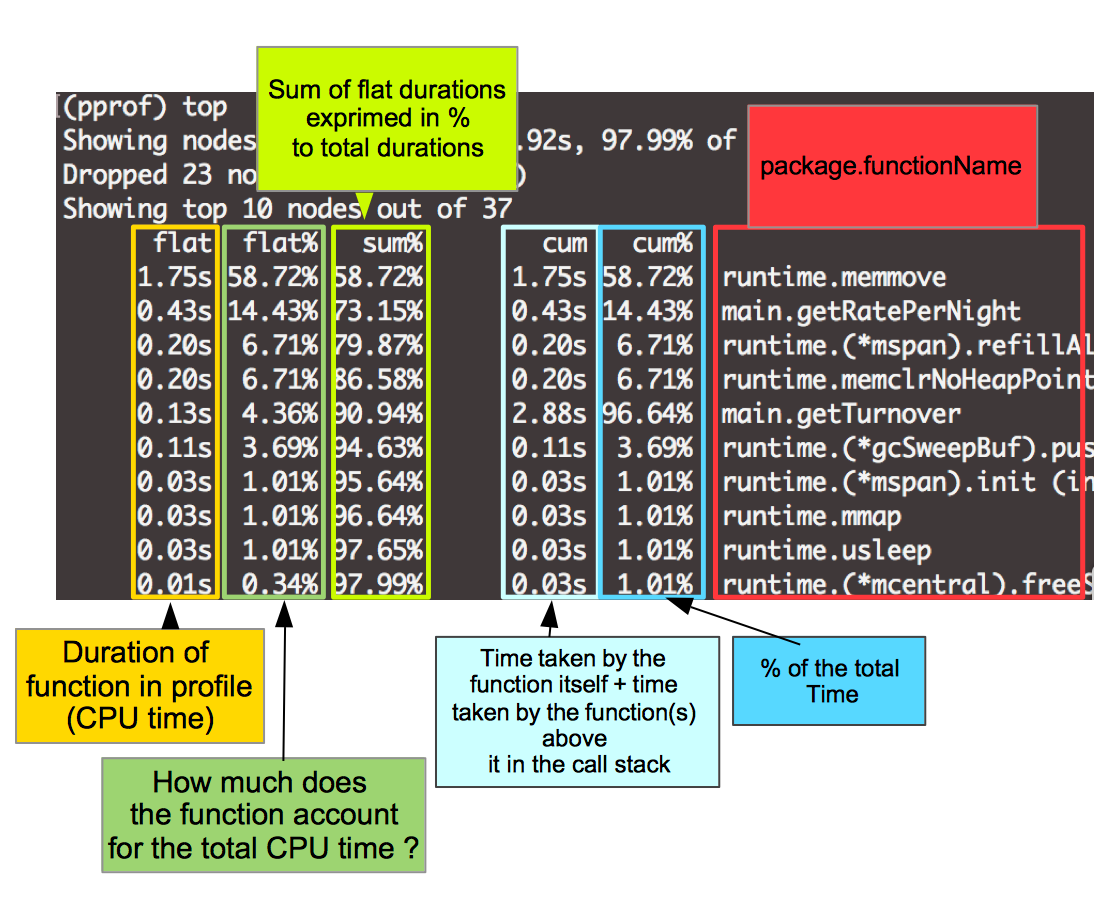
使用 go tool pprof 自带分析工具,可以以不同形式输出 profile 分析结果,如:top,svg,traces,list。
top
top 命令把采样值按大小排序。
 1
 2
 3
 4
 5
 6
 7
 8
 9
10
11
12
13
14
15
| (pprof) top
Showing nodes accounting for 25.58s, 99.46% of 25.72s total
Dropped 25 nodes (cum <= 0.13s)
Showing top 10 nodes out of 23
flat flat% sum% cum cum%
16.87s 65.59% 65.59% 16.87s 65.59% main.getExchangeRate
6.15s 23.91% 89.50% 6.15s 23.91% runtime.memclrNoHeapPointers
2.03s 7.89% 97.40% 2.03s 7.89% runtime.nanotime
0.24s 0.93% 98.33% 0.24s 0.93% main.getRatePerNight
0.21s 0.82% 99.14% 0.21s 0.82% runtime.(*mspan).init (inline)
0.07s 0.27% 99.42% 23.62s 91.84% main.getTurnover
0.01s 0.039% 99.46% 6.44s 25.04% runtime.growslice
0 0% 99.46% 23.63s 91.87% main.main
0 0% 99.46% 6.42s 24.96% runtime.(*mcache).nextFree
0 0% 99.46% 6.42s 24.96% runtime.(*mcache).nextFree.func1
|
list
list 接收一个正则匹配,展示定位源代码。
 1
 2
 3
 4
 5
 6
 7
 8
 9
10
11
12
13
14
15
16
17
18
19
| pprof list
(pprof) list func1
Total: 2.67s
ROUTINE ======================== main.main.func1 in /Users/xxx/go/src/awesomeProject/main.go
2.65s 2.67s (flat, cum) 100% of Total
. . 20: for i := 0; i < 3; i++ {
. . 21: idx := i
. . 22: wg.Add(1)
. . 23: go pprof.Do(context.Background(), pprof.Labels("idx", fmt.Sprintf("%d", idx)), func(ctx context.Context) {
. . 24: sum := 0
2.65s 2.65s 25: for d := 0; d < 3_000_000_000; d++ {
. . 26: sum += d
. . 27: }
. 20ms 28: wg.Done()
. . 29: })
. . 30: }
. . 31:
. . 32: wg.Wait()
. . 33:}
|
traces
traces 打印采样信息。
 1
 2
 3
 4
 5
 6
 7
 8
 9
10
11
| (pprof) traces
Type: cpu
Time: Mar 14, 2022 at 8:19pm (CST)
Duration: 501.52ms, Total samples = 330ms (65.80%)
-----------+-------------------------------------------------------
310ms main.main
runtime.main
-----------+-------------------------------------------------------
20ms main.main
runtime.main
-----------+-------------------------------------------------------
|
-base
可以把同一程序的某一时刻 profile 作为当前 profile 的基准进行差值分析,基准 profile 使用 -base 指定。


