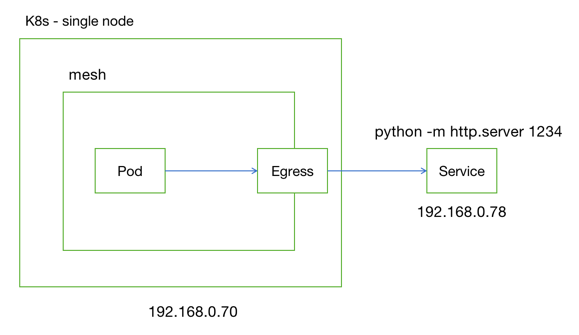
本文介绍如何配置 Istio 使服务网格内的服务通过 Egress 网关访问外部服务。实验架构图如下,服务网格运行在 K8s 集群上,外部服务单独部署在集群外的一台虚拟机上。

环境准备
使用阿里云部署一个托管单节点 K8s 集群,再在同一 VPC 下创建一个 ECS 实例(假设 IP 地址为 192.168.0.78)用于部署外部服务。在 K8s 集群上安装 Istio,注意:1. 安装时同时开启 Egress Gateway;2.设置只允许访问注册进服务网格的服务;3. 开启 Envoy 访问日志(别忘了!):
1
2
3
4
5
| istioctl install \
--set components.egressGateways[0].name=istio-egressgateway \
--set components.egressGateways[0].enabled=true \
--set meshConfig.outboundTrafficPolicy.mode=REGISTRY_ONLY \
--set meshConfig.accessLogFile=/dev/stdout
|
在集群外的这个虚拟机(192.168.0.78)上开启 HTTP 服务,监听端口为 1234:
1
| python -m http.server 1234
|
在 K8s 集群上部署一个开启 istio 代理的 Pod 用于作为测试客户端来访问:
 1
 2
 3
 4
 5
 6
 7
 8
 9
10
11
12
13
14
15
16
17
18
19
20
21
| kubectl label namespace default istio-injection=enabled
kubectl apply -f - <<EOF
apiVersion: apps/v1
kind: Deployment
metadata:
name: sleep
spec:
selector:
matchLabels:
app: sleep
template:
metadata:
labels:
app: sleep
spec:
containers:
- name: sleep
image: curlimages/curl
command: ["/bin/sleep", "3650d"]
imagePullPolicy: IfNotPresent
EOF
|
尝试从 sleep Pod 中测试访问 192.168.0.78:1234 的 HTTP 服务,可以发现无法访问。这是因为 istio-proxy 阻止了请求。
1
2
3
| $ kubectl exec sleep-7c7db887d8-9dnd7 -- curl -sSL -o /dev/null -D - 192.168.0.78:1234
curl: (56) Recv failure: Connection reset by peer
command terminated with exit code 56
|
实验
Step 1. 通过 ServiceEntry 将外部服务注册到服务网格
ServiceEntry 用于将外部服务注册到服务网格。由于外部服务是静态 IP 地址,因此 resolution 字段的值为 STATIC。将下面 ServiceEntry 部署到集群,就可以在 sleep 容器中访问 192.168.0.78:1234。
 1
 2
 3
 4
 5
 6
 7
 8
 9
10
11
12
13
14
15
16
17
| $ kubectl apply -f - <<EOF
apiVersion: networking.istio.io/v1beta1
kind: ServiceEntry
metadata:
name: my-server-se
spec:
endpoints:
- address: 192.168.0.78
hosts:
- my.server.com
location: MESH_EXTERNAL
ports:
- name: http
number: 1234
protocol: TCP
resolution: STATIC
EOF
|
ServiceEntry 的坑:
spec.addresses 在 ports.protocol=HTTP 时被忽略。因此,如果需要通过 IP 访问 HTTP 服务,应把 ports.protocol 设置为 TCP;- 对于没有域名只有 IP 的外部服务,可以把外部服务通过 Headless Service + Endpoint 注册到 K8s 的 DNS 组件(否则得用其他 DNS 服务器),就可以使用 DNS 模式了;
- 可解析的域名 + STATIC + spec.endpoints 组合可以把任意可解析的域名请求转发到指定 endpoints:
 1
 2
 3
 4
 5
 6
 7
 8
 9
10
11
12
13
14
15
16
| # apply 后就可以 kubectl exec sleep-7c7db887d8-9dnd7 -- curl -s www.baidu.com:1234
apiVersion: networking.istio.io/v1alpha3
kind: ServiceEntry
metadata:
name: my-server-se
spec:
hosts:
- www.baidu.com
ports:
- number: 1234
name: http
protocol: HTTP
location: MESH_EXTERNAL
resolution: STATIC
endpoints:
- address: 192.168.0.78
|
此时,虽然可以访问 192.168.0.78:1234,但通过 istio-proxy 容器日志可以看到,是直连访问。
1
2
3
4
5
6
| $ kubectl exec sleep-7c7db887d8-9dnd7 -- curl -sSL -o /dev/null -D - 192.168.0.78:1234
HTTP/1.0 200 OK
Server: SimpleHTTP/0.6 Python/3.6.8
Date: Sat, 19 Feb 2022 07:37:40 GMT
Content-type: text/html; charset=utf-8
Content-Length: 690
|
1
2
| $ kubectl logs sleep-7c7db887d8-9dnd7 -c istio-proxy
[2022-02-19T07:40:50.499Z] "- - -" 0 - - - "-" 85 844 9 - "-" "-" "-" "-" "192.168.0.78:1234" outbound|1234||my.server.com 10.108.0.50:47780 192.168.0.78:1234 10.108.0.50:47778 - -
|
Step 2. 在 Egress Gateway 上开放 2234 端口
1
2
3
4
5
6
7
8
| istioctl install \
--set components.egressGateways[0].name=istio-egressgateway \
--set components.egressGateways[0].enabled=true \
--set meshConfig.outboundTrafficPolicy.mode=REGISTRY_ONLY \
--set meshConfig.accessLogFile=/dev/stdout \
--set components.egressGateways[0].k8s.service.ports[0].name=my-server \
--set components.egressGateways[0].k8s.service.ports[0].port=2234 \
--set components.egressGateways[0].k8s.service.ports[0].protocol=TCP
|
Step 3. 配置 Gateway 和 VirtualService 使流量经过网关
Gateway 网关用于管理进出服务网关的流量。如下 Gateway 绑定 Istio 默认安装的 egress gateway 组件,并允许访问 my.server.com 的流量从 2234 端口出去。
 1
 2
 3
 4
 5
 6
 7
 8
 9
10
11
12
13
14
15
16
| $ kubectl apply -f - <<EOF
apiVersion: networking.istio.io/v1beta1
kind: Gateway
metadata:
name: my-server-gw
spec:
selector:
istio: egressgateway
servers:
- hosts:
- my.server.com
port:
name: http
number: 2234
protocol: TCP
EOF
|
接着,通过 VirtualService 绑定网关,指定要流经 Gateway 的流量转发规则。.spec.gateways 表示 my-server-gw 选择的网关(istio: egressgateway)以及服务网格里的所有 Istio sidecar(mesh)都要应用该 VirtualService 路由规则。发往 my.server.com 的请求,会首先在所在 Pod 的 Istio-proxy 上匹配到第一条规则,并因此发往 istio-egressgateway.istio-system.svc 服务的 2234 端口;接着,my-server-gw 选择的网关会匹配 2234 端口收到的流量,转发到 my.server.com:1234。
 1
 2
 3
 4
 5
 6
 7
 8
 9
10
11
12
13
14
15
16
17
18
19
20
21
22
23
24
25
26
27
28
29
30
31
32
33
| $ kubectl apply -f - <<EOF
apiVersion: networking.istio.io/v1beta1
kind: VirtualService
metadata:
name: my-server-vs
spec:
gateways:
- my-server-gw
- mesh
hosts:
- my.server.com
tcp:
- match:
- destinationSubnets: # 指定流量匹配规则
- 192.168.0.78/32
gateways:
- mesh # 指定 istio-proxy 收到的流量应用该 "匹配-路由" 规则
port: 1234
route:
- destination:
host: istio-egressgateway.istio-system.svc.cluster.local
port:
number: 2234
- match:
- gateways:
- my-server-gw # 指定 egress gateway 收到的流量应用该 "匹配-路由" 规则
port: 2234
route:
- destination:
host: my.server.com
port:
number: 1234
EOF
|
Step 4. 测试
1
2
3
4
5
6
| $ kubectl exec sleep-7c7db887d8-9dnd7 -- curl -sSL -o /dev/null -D - 192.168.0.78:1234
HTTP/1.0 200 OK
Server: SimpleHTTP/0.6 Python/3.6.8
Date: Sat, 19 Feb 2022 08:50:58 GMT
Content-type: text/html; charset=utf-8
Content-Length: 690
|
现在可以看到,sleep Pod 的 istio-proxy 和 Egress Gateway 有正确的访问日志,流量经过 Egress 网关。
1
2
3
4
5
| $ kubectl logs -l app=sleep -c istio-proxy
[2022-02-19T09:31:17.146Z] "- - -" 0 - - - "-" 85 844 1 - "-" "-" "-" "-" "10.108.0.55:2234" outbound|2234||istio-egressgateway.istio-system.svc.cluster.local 10.108.0.56:33706 192.168.0.78:1234 10.108.0.56:50898 - -
$ kubectl logs -n istio-system -l istio=egressgateway
[2022-02-19T09:31:17.147Z] "- - -" 0 - - - "-" 85 844 12 - "-" "-" "-" "-" "192.168.0.78:1234" outbound|1234||my.server.com 10.108.0.55:49356 10.108.0.55:2234 10.108.0.56:33706 - -
|
